This is an operational aid only. For instructions on setting up an Airmail station, go to the Airmail website or seek assistance for an experienced Airmail user!
The screen to the left is the basic Airmail window that is your work space when using the software. The second icon from the left is your address book. The addresses may be written as you would in your regular email program address book or it may be imported from an Airmail address book or other CSV file.
The third icon from the left, is a blank page that allows you to compose a message as you would any email message. When you click on this icon, you will note that you have a "To" line and a "CC" line. You address book will also be opened. Select the address that you wish to send your message to and place your cursor in the body of the message and compose your traffic. You may also copy and paste information from a file. You can also attach a file with your message but if this is a photo you will want to keep it very small because of the available bandwidth.
It is best to use something like JPEG for photos. Keep your photo files small as possible. If you have a text file you may want to consider copying and pasting this into the body of your message. This makes for a smaller file and allows it to transmitted faster. When you have completed your letter you will wan to save it for transmitting.
To do save you message go the 7th icon from the left that looks like a rural mailbox. With your message open, click on the mailbox and your message will be stored there. You may compose multi messages and save each one as described above. You may also want to just send a single message.
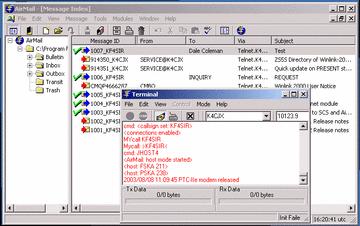
To send your message you will now need to open your terminal window. You may do this by going to the word "Modules" on the top line and clicking. This will reveal a drop down list with a selection of "Packet Client". Click on Packet Client and the "Terminal" window will appear. Now make sure the second small window from the right has your the call of your RMS gateway and the address of your digi if one is required. If you were going to work a gateway direct it would show an address such as W4GHS-10. If you lived fifty miles away and needed to go through a digi you would place an address like, W4GHS-10 W4GHS-5. (there is a space between the -10 and the beginning of W4GHS-5) This would be your gateway first and the digi second. This digi is about 40 air miles from the gateway on a peak at over 4500 above sea level that allows the system to be used by stations from long distances.
Now you are ready to send your traffic. You will see a green "go sign", far left and you will now click on this sign. You will then see a connection being made to the gateway. Next you will see a connection being made to a server. This server may be located in the US, Canada, Australia, or Austria. You will then see your message being sent in a compressed format on a horizontal bar graph (far left) and if there is traffic waiting for you, you will see your received traffic being downloaded on a bar graph on the right. When these task are completed you will be disconnected. Later if you have no outgoing traffic but wish to see if there is incoming traffic for you, click on the green "go" button and it will connect and check to see if the server has traffic for you and will download the traffic if messages are pending.
To read your incoming messages click on the "Inbox" at the far left. Your unread messages will show with a red flag attached to denote they are unread. To view the message that you have sent, go to the outbox and click on the message and it will appear in the normal mail format. To exit a message, click on the lower "X". If you click on the top "X" you will close the Airmail program.
If you wish to reply to a message that has been sent to you, highlight the message by clicking and dragging over it. Right click the highlighted message and then click on "copy" Then click on the "U-Turn" arrow icon (5th from the left). This will address your blank page with the address of the sender. Right click and paste the message that you are replying and complete your reply. Save your message to the mailbox and send as instructed above.
These are basic instructions to get started. Practice and get with other Winlink useds to build on your basic skills. If you have questions, email me.